Creating a truly healthy nursery goes far beyond choosing a paint colour; it’s about managing a timeline of invisible chemical risks.
- Standard furniture can silently release formaldehyde, a known carcinogen, for up to two years after purchase.
- The “Zero-VOC” claim on a paint can is often a marketing statement, not a scientific guarantee, especially after pigments are added.
Recommendation: Adopt a protocol-based approach: test for legacy toxins, verify third-party certifications, and implement a rigorous ventilation strategy to ensure your baby’s environment is genuinely safe.
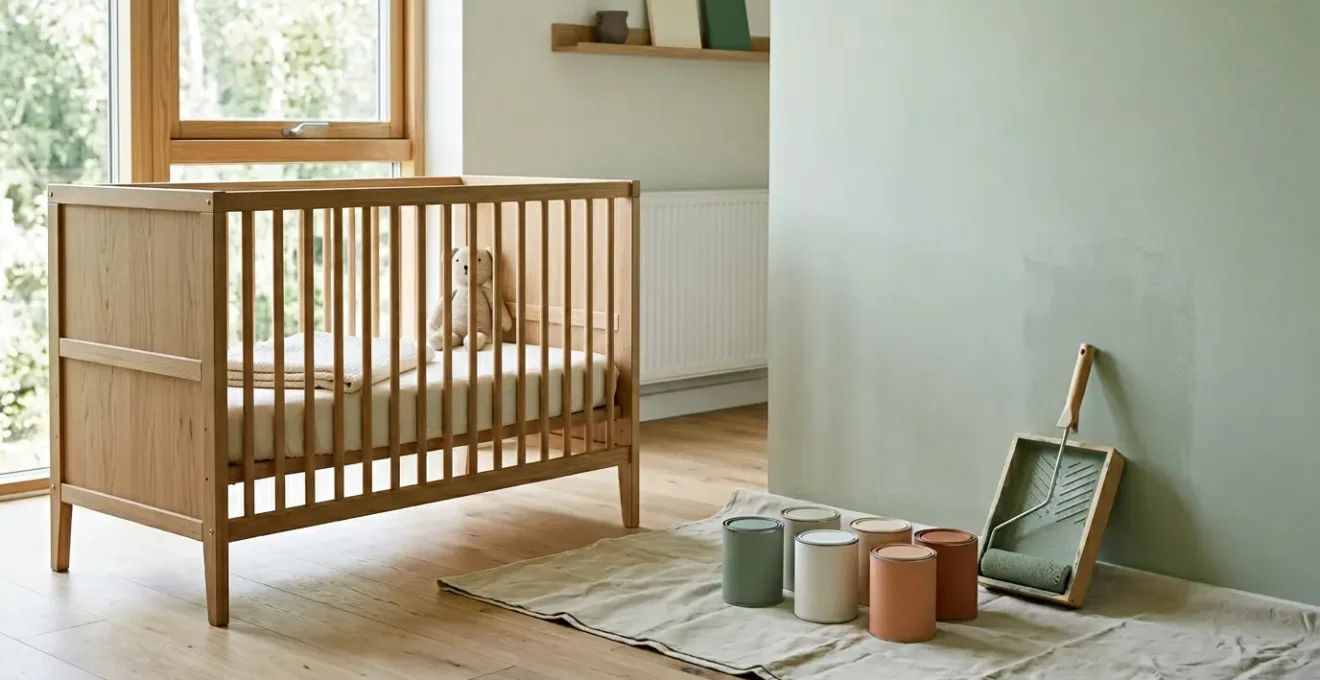
The journey to parenthood is filled with a unique blend of excitement and protective anxiety. Preparing the nursery is a cherished ritual, a tangible act of love. You meticulously choose the crib, the colour scheme, and the softest textiles. Yet, beneath this creative joy lies a nagging worry, particularly for health-conscious parents in the UK: are the very materials we’re bringing into this sanctuary safe for a newborn’s delicate respiratory system? The smell of new paint or a flat-pack wardrobe, often dismissed as the scent of “newness,” is in fact a chemical cocktail of Volatile Organic Compounds (VOCs) off-gassing into the air your baby will breathe.
Common advice often feels generic: “use low-VOC paint” and “air out the room.” While not incorrect, this guidance barely scratches the surface of what’s required for true peace of mind. It overlooks the persistent off-gassing from furniture, the hidden dangers in charming second-hand finds, and the critical difference between paint that is dry and paint that is chemically cured. This lack of detailed, scientific information leaves well-intentioned parents vulnerable to misleading marketing and a false sense of security.
But what if the key wasn’t just to buy “green” products, but to understand the scientific principles behind a healthy indoor environment? The real power lies in shifting your mindset from a passive consumer to an informed project manager for your baby’s health. This guide is built on that premise. It’s not just a list of tips; it’s a series of risk-mitigation protocols, designed by a green building consultant, to empower you to look beyond the labels and make decisions based on data and chemical timelines.
We will systematically deconstruct the primary risks, from formaldehyde in new furniture to lead in vintage pieces. We’ll provide a clear framework for interpreting paint certifications, compare flooring options for allergy reduction, and establish a definitive safety window for when the nursery is truly ready for its precious occupant. By the end, you will have the knowledge to build not just a beautiful nursery, but a genuinely non-toxic haven.
This comprehensive guide provides a structured path to understanding and mitigating the hidden risks in your nursery renovation. Below is a summary of the key areas we will explore, giving you the expert knowledge to protect your new arrival.
Summary: A Parent’s Guide to a Toxin-Free Nursery
- Why standard furniture can release formaldehyde for 2 years after purchase?
- How to read paint labels to distinguish “Low VOC” from “Zero VOC” marketing claims?
- Wool carpet or Linoleum: Which flooring is better for reducing allergy risks in babies?
- The lead paint danger lurking in that “upcycling project” from the flea market
- When to finish painting: The safety window required before a baby sleeps in the room?
- Why motion sensors are more dignified and effective than installing cameras in the lounge?
- Why increasing fiber is the single most effective dietary change to reduce cancer risk?
- How to Set Up Smart Home Automation to Help Elderly Parents Live Independently Longer?
Why standard furniture can release formaldehyde for 2 years after purchase?
That brand-new cot or changing table may look pristine, but it could be the single largest source of indoor air pollution in your nursery. The culprit is formaldehyde, a chemical widely used in the resins and adhesives that bind composite wood products like MDF (medium-density fibreboard), particleboard, and plywood. These materials form the core of much of today’s affordable, flat-pack furniture. The process, known as off-gassing, isn’t a brief event; it follows a predictable decay curve where the highest emissions occur in the first few months, but they don’t stop there. In fact, research shows most formaldehyde is released within 2 years, meaning the furniture continues to pollute the air long after the “new” smell has faded.
This prolonged release poses a significant risk to infants, whose developing respiratory and immune systems are far more vulnerable to airborne toxins. The off-gassing curve is accelerated by heat and humidity, common conditions in a centrally heated UK home. This means that an item that was off-gassing at a low rate in a cool warehouse can begin releasing chemicals more aggressively once inside a warm, cosy nursery. Simply unboxing furniture in the room it’s destined for is, from a chemical perspective, the worst possible approach. To truly mitigate this risk, you must manage the furniture’s introduction to your home with a clear protocol.
Your Action Plan: Furniture Detox Protocol
- Unwrap furniture outside or in a well-ventilated garage immediately upon delivery, before bringing it into the nursery.
- Allow the furniture to air out for at least 1-2 weeks in this ventilated space to capture the initial high-release period.
- Control indoor temperature and humidity; keep the nursery cooler and use a dehumidifier, as higher heat and humidity accelerate formaldehyde release.
- Once moved indoors, maintain cross-ventilation by opening windows and using fans to continuously exchange air for at least the first month.
- For future purchases, look for solid wood or furniture certified GREENGUARD Gold or labelled NAF (No Added Formaldehyde).
By treating new furniture as a potential source of pollution and managing its “quarantine” period, you actively take control of the indoor air quality. This protocol is the most effective defence against the long-term chemical exposure from composite wood products.
How to read paint labels to distinguish “Low VOC” from “Zero VOC” marketing claims?
Navigating the paint aisle can feel like a victory for health-conscious parents, with tins proudly displaying “Low-VOC,” “Zero-VOC,” and even “Eco-Friendly” labels. However, these terms are often marketing-driven and not legally regulated to the extent consumers believe. The critical flaw in many “Zero-VOC” claims lies in the tinting process. The base paint may indeed have less than 5 g/l of VOCs (the typical threshold for a “zero” claim), but the pigments used to create that perfect shade of sage green or dusky rose are a different story. In fact, research on paint pigmentation shows that colorants can add 10-100 g/l of VOCs to base paint, with darker, more vibrant colours adding the highest load. This effectively turns your “zero-VOC” paint into a low or even medium-VOC product the moment it’s mixed.
To make a genuinely informed choice, you must look beyond the front-of-can marketing and seek out third-party certifications. These independent organisations test the final, tinted product for a wide range of chemical emissions, not just the base ingredients. They provide the layer of verification and transparency that manufacturer claims lack. For a nursery, the gold standard is, quite literally, GREENGUARD Gold, which sets the strictest limits on emissions, specifically accounting for the sensitivities of children and the elderly. Understanding these certifications is key to decoding paint labels effectively.
This comparative table clarifies what different certifications actually mean for your nursery’s air quality, as detailed in analyses of indoor air quality standards.
| Certification | Total VOC Limit | Formaldehyde Limit | Best For | Stringency Level |
|---|---|---|---|---|
| GREENGUARD Gold | <220 μg/m³ (after 7 days) | <0.05 ppm | Nurseries, schools, healthcare facilities (sensitive populations) | Most Stringent |
| Green Seal GS-11 | <50 g/l (flat paint) | Prohibits formaldehyde as intentional ingredient | General residential use, eco-conscious consumers | Moderate-High |
| SCS Indoor Advantage Gold | Meets CA Section 01350 | Comprehensive chemical emissions testing (80+ chemicals) | High-performance buildings, LEED projects | High |
| Zero-VOC Label (unverified) | <5 g/l (varies by manufacturer) | Not regulated | Marketing claim only – requires third-party verification | Variable/Unregulated |
As the table demonstrates, a simple “Zero-VOC” label offers the least assurance. For the ultimate peace of mind, prioritising a product with GREENGUARD Gold certification ensures the paint has been rigorously tested for over 360 VOCs and is safe for the most sensitive environments.
Wool carpet or Linoleum: Which flooring is better for reducing allergy risks in babies?
The choice of flooring in a nursery has profound implications for indoor air quality and allergen control. The debate often centres on two seemingly “natural” options: wool carpet and linoleum. Wool is a natural, renewable fibre, and high-quality, untreated wool carpets can be free of the synthetic chemicals found in nylon counterparts. However, their fibrous nature makes them a haven for dust mites, pollen, and pet dander. For a baby who will spend significant time on the floor, this can be a major trigger for allergies and asthma. Regular, deep cleaning with a HEPA-filter vacuum is essential, but completely eliminating trapped allergens is nearly impossible.
Linoleum, on the other hand, presents a compelling alternative. Often confused with vinyl (a synthetic PVC product), true linoleum is made from natural, biodegradable materials. As Portland-based architect and author Eric Corey Freed notes in an interview with Allergic Living magazine:
Linoleum is a natural product made from linseed oil and sawdust. It’s naturally antistatic and anti-dust, so it’s great for people with allergies.
– Eric Corey Freed, Allergic Living magazine
Its smooth, seamless surface is easy to clean and prevents allergens from accumulating. However, the adhesives used for installation can introduce VOCs, so it’s crucial to select a low- or zero-VOC adhesive. While linoleum is an excellent choice, it’s worth considering another premium, natural material that combines the benefits of a hard surface with a soft, warm feel: cork.
Case Study: Cork Flooring as a Superior Hypoallergenic Alternative
Cork flooring demonstrates superior antimicrobial properties due to suberin, a naturally occurring waxy substance in cork oak bark that actively repels mold, mildew, and over 38 species of insects including termites. Unlike wool carpet which can harbor dust mites, or linoleum which requires careful adhesive selection, cork’s cellular structure (30-40 million air-filled cells per cubic centimeter) provides natural anti-static properties that repel dust and pet hair, while offering thermal insulation and acoustic dampening ideal for nursery environments. The material is hypoallergenic without chemical treatments and requires no formaldehyde-based adhesives when installed as a floating floor, making it an outstanding choice for minimising allergy risks from day one.
Ultimately, for minimising allergy risk, a smooth, easily cleaned surface like linoleum or cork is superior to even the most natural carpet. They prevent the build-up of allergens, contributing to a healthier breathing environment for your baby.
The lead paint danger lurking in that “upcycling project” from the flea market
The trend of upcycling vintage furniture for a nursery is appealing; it’s sustainable, budget-friendly, and adds a unique, personal touch. However, that charming pre-loved dresser or rocking chair from a flea market could be harbouring a serious, invisible danger: lead paint. Before its dangers were fully understood, lead was a common additive in paint to increase durability and opacity. The problem is particularly acute in older, lighter-coloured paints. According to historical data, white paint from structures built before 1955 could contain up to 50% lead by weight. There is no safe level of lead exposure for children, as it can cause irreversible neurological and developmental damage.
The greatest risk comes from sanding. The process of sanding down an old piece of furniture creates a fine dust of lead particles that can be easily inhaled or settle on surfaces throughout your home, contaminating the nursery before it’s even assembled. This is why the first and most crucial step is always to test, not guess. Simple, inexpensive lead test swabs are readily available from DIY stores in the UK and provide an immediate result. If lead is detected, your project is not necessarily over, but your method must change dramatically. Sanding is off the table; the safe alternative is encapsulation.
Encapsulation involves sealing the lead paint under a durable, protective barrier, preventing it from chipping, peeling, or turning to dust. This is a far safer approach than attempting removal. By following a strict, no-sand protocol, you can safely preserve a beautiful vintage piece without compromising your child’s health.
Here is a safe, no-sand refinishing protocol for furniture that tests positive for lead:
- Test First: Use a lead test swab on a worn area. A pink or red result indicates the presence of lead.
- Clean Safely: In a well-ventilated area (ideally outdoors), gently wipe the surface with a damp cloth to remove any loose dust or flakes. Do not use a dry cloth.
- Apply an Encapsulating Primer: Use a specialised primer designed to seal in lead, such as a shellac-based sealer. This creates a durable barrier.
- Build a Barrier: Apply at least two to three coats of the encapsulant, allowing it to dry completely between each coat as per the manufacturer’s instructions.
- Finish with Safe Paint: Once the encapsulant is fully cured, you can paint over it with your chosen certified zero-VOC nursery paint.
- Strict Cleanup: Dispose of all cloths and materials in a sealed bag. Wet-mop the work area and change your clothes before re-entering your home to prevent tracking in any potential contaminants.
This methodical approach is the only way to ensure that a piece of history does not become a source of modern-day harm.
When to finish painting: The safety window required before a baby sleeps in the room?
One of the most common and critical mistakes in nursery preparation is misunderstanding the difference between paint that is “dry to the touch” and paint that is fully “cured.” While a freshly painted wall might feel dry in a few hours, the chemical process of curing—during which the remaining solvents and VOCs are released into the air—takes much longer. Even with certified “Zero-VOC” paints, other chemicals and odours are released as the paint hardens. Rushing a baby into a room that smells of fresh paint means exposing them to the peak of this off-gassing period. So, what is the minimum safe waiting period?
From a green building consultant’s perspective, the answer must be conservative and science-based. While off-gassing is highest in the first 72 hours, the process is far from over. Paint manufacturers themselves confirm that even the safest formulas have a lengthy curing timeline; zero-VOC paints require 2-4 weeks for a full cure and complete off-gassing. This means the absolute minimum safety window between the final coat of paint and the baby sleeping in the room should be one full month (30 days). This allows for the vast majority of chemical emissions to dissipate.
You can, and should, take active steps to accelerate this process and ensure the air is as clean as possible. This involves more than just cracking a window; it requires a proactive ventilation and air purification strategy. An optional “bake-out” method, borrowed from the green building industry, can be particularly effective. This involves using heat to speed up the chemical reactions of curing, forcing the majority of off-gassing to happen in a controlled, ventilated period.
Follow this active ventilation protocol to ensure the room is truly ready:
- Week 1 (Active Extraction): For the first seven days, place a box fan in the nursery window facing outwards. This creates negative pressure, actively pulling fumes out of the room rather than just circulating them. Open a window in another part of the house to create a cross-breeze.
- Optional “Bake-Out” (Days 2-3): After the first 24 hours, close the door and use a safe space heater to raise the room temperature to around 27-32°C for 48 hours, while keeping the window fan running. This significantly speeds up the off-gassing of chemicals.
- Weeks 2-4 (Flush Out): Continue to ventilate the room daily for several hours, even in cooler weather. The goal is continuous air exchange to flush out any remaining VOCs.
- Air Purification: Throughout this period, run a high-quality air purifier equipped with a substantial activated carbon filter. HEPA filters are excellent for particles like dust and pollen, but only activated carbon can effectively capture and neutralise the gaseous VOC molecules.
Adhering to the 30-day rule, combined with this active ventilation protocol, provides the highest level of assurance that your nursery’s air is clean and safe for your baby’s arrival.
Why motion sensors are more dignified and effective than installing cameras in the lounge?
As our families grow and evolve, our focus on creating a safe home environment often expands to include aging parents. While preparing a nursery focuses on mitigating chemical risks, ensuring the safety of an elderly parent living independently involves mitigating physical and health risks. The immediate impulse for many is to install cameras for monitoring, but this approach can feel intrusive and erode a person’s sense of dignity and privacy. A more respectful and often more effective solution lies in the discreet use of smart motion sensors.
Unlike a camera, which captures personal moments, a motion sensor simply registers activity as a data point: ‘motion detected in the kitchen at 8:00 AM,’ ‘no motion in the living room for 3 hours.’ This data, when viewed as a pattern, provides powerful insights into a person’s well-being without violating their privacy. A sudden change in routine—such as not entering the kitchen for breakfast by 10 AM, or motion detected in the bathroom for an unusually long period—can trigger a discreet alert to a family member. This allows for a check-in call or visit based on an objective change in behaviour, rather than constant surveillance.
Furthermore, motion sensors can be integrated into a wider smart home system to enhance safety proactively. For instance, a sensor detecting movement in the hallway at night can automatically turn on low-level lighting to prevent falls. They can confirm that doors are closed at night or that medicine cabinets are opened at the correct times. This approach shifts the focus from “watching” to “assisting,” using technology to create a responsive, intelligent safety net that respects the independence and dignity of an aging parent. It is a system built on trust and data, not on surveillance.
Why increasing fiber is the single most effective dietary change to reduce cancer risk?
While we meticulously manage the environmental toxins in our homes, from the nursery onwards, it’s crucial to recognise that one of the most powerful tools for long-term family health lies in our daily nutritional choices. Among all dietary factors, a robust body of scientific evidence points to one incredibly powerful preventative measure: increasing dietary fibre. It is widely considered the most impactful dietary change one can make to reduce the risk of certain cancers, particularly colorectal cancer, which is one of the most common cancers in the UK.
The protective mechanisms of fibre are multifaceted. First, soluble and insoluble fibres add bulk to stool, which dilutes potential carcinogens and speeds up their transit time through the colon, reducing the duration of contact with the intestinal lining. Second, and perhaps more importantly, fibre acts as a prebiotic—food for the trillions of beneficial bacteria in our gut microbiome. When these bacteria ferment fibre, they produce short-chain fatty acids (SCFAs) like butyrate. Butyrate is a superstar compound; it serves as the primary energy source for the cells lining our colon, helps maintain a healthy gut barrier, reduces inflammation, and has been shown to induce apoptosis (programmed cell death) in cancer cells.
A diet low in fibre essentially starves this beneficial gut ecosystem, potentially allowing inflammatory conditions to persist and harmful bacteria to thrive. Conversely, a diet rich in fibre from diverse sources—such as vegetables, fruits, legumes, whole grains, nuts, and seeds—cultivates a robust and resilient gut microbiome that actively works to protect the body. Making simple swaps, like choosing wholemeal bread over white, adding lentils to a soup, or snacking on an apple instead of crisps, are small steps that contribute to this powerful, long-term risk reduction strategy for the entire family.
Key Takeaways for a Healthy Nursery
- Formaldehyde from furniture off-gasses for up to two years; active ventilation and pre-airing are non-negotiable.
- ‘Zero-VOC’ paint isn’t truly zero once tinted. Always verify with third-party certifications like GREENGUARD Gold.
- Vintage furniture poses a significant lead paint risk. Test before you start any project and use encapsulation methods instead of sanding.
How to Set Up Smart Home Automation to Help Elderly Parents Live Independently Longer?
Building on the principle of using discreet technology for safety, a cohesive smart home system can create a powerful support network that enables elderly parents to live independently and safely for longer. It’s about creating an environment that anticipates needs and provides gentle reminders and automatic safeguards. Setting this up is less about technical wizardry and more about thoughtful planning around daily routines and potential risks. The goal is to build layers of support that reduce daily friction and provide peace of mind for the whole family.
The foundation of such a system often starts with a central voice assistant (like Amazon Alexa or Google Assistant). This provides an easy, hands-free way for parents to control devices, make calls, or get information, which is especially helpful for those with mobility or vision issues. From there, you can integrate several key components:
- Smart Lighting: Replace key bulbs with smart bulbs. These can be scheduled to brighten in the morning and dim at night, supporting a healthy circadian rhythm. Crucially, they can be linked to motion sensors, as discussed previously, to automatically light a path to the bathroom at night, dramatically reducing the risk of falls.
- Automated Reminders: Voice assistants can be programmed to provide daily verbal reminders for taking medication, attending appointments, or even just drinking a glass of water. This offloads the mental burden and ensures critical tasks aren’t forgotten.
- Smart Plugs and Appliances: A smart plug can turn any regular appliance into a smart one. This is perfect for items that pose a fire risk if left on, such as an iron or a space heater. You can set an automatic timer to turn them off after an hour, or check and switch them off remotely.
- Smart Locks and Doorbells: A smart lock can automatically lock the door at night and can be set to allow entry for trusted caregivers or family members without the need for physical keys. A video doorbell allows your parent to see who is at the door without having to open it, enhancing security.
By combining these elements, you create a home that doesn’t just passively house your loved one, but actively participates in their care and safety. It’s a proactive approach to independent living, using technology to build a responsive and protective environment that adapts to their needs.
By applying these principles of informed vigilance, from the air your baby breathes to the long-term health and safety of your entire family, you are building more than just a beautiful room; you are building a foundation for a healthy life. Start today by creating your own nursery safety protocol, confident that you are making the best possible choices for your loved ones.